Legend of Zelda: Tears of the Kingdom: All Zonai Devices RANKED!


Being one of the most interesting and innovative new ideas that was not present in Breath of the Wild, Zonai Devices are a very interesting new mechanic that definitely deserves to be talked about, Each Zonai Device in Tears of the Kingdom is just so unique, and because of that, I just had to make this article. Now without further ado, RPG Ranked presents... Legend of Zelda: Tears of the Kingdom: All Zonai Devices RANKED!
27. Light - F Tier

The fact this even exists baffles me. Simply Ultrahand-ing a Brightbloom Seed and attaching it to anything can function as a light... so what kind of purpose does this have? I guess if you want a light source more aesthetic than a Brightbloom Seed? I find Brightbloom Seeds to look cooler than these lights anyway, so unless you want hyperrealistic vehicles (which is not the name of the game in Tears of the Kingdom), this Zonai Device is not worth investing the charges in.
26. Balloon - D Tier

It is hard to imagine there was a time where I actually enjoyed the Balloons in Tears of the Kingdom. But with so much more inventive options like hoverbikes and ultimate battle machines, this Zonai Device just gets completely lost to the wayside. While still fun to occasionally whip out for the heck of it, so much more vertical ground can be covered with a simple hover bike (made simply of two fans and a steering stick). While I adore the shrine that surrounds the introduction of the Balloon, as a device itself, it is anything but exceptional.
25. Time Bomb - D Tier

I tried so very hard to like this. It is quite awesome in theory, and a different take on the Remote Bombs from Breath of the Wild. But in a game where Cannons, Yunobo, and Bomb Flowers reign supreme in terms of explosions, there is just not really a point of using these Time Bombs unless specifically trying to save the aforementioned much better explosives. This shouldn't be as low as it is on paper, but in practice? It is mediocre at best.
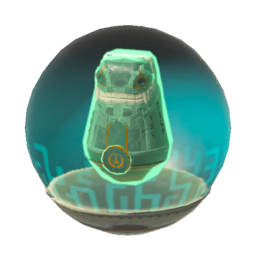
24. Shock Emitter - C Tier

Unlike the other two emitters, this one is all short-ranged and too on the nose. I'd much rather use an alternative, like a thrown or arrow-fused Shock Fruit or Electric Chu-Chu Jelly! While I occasionally slap this on Mineru, it truly is a great example of a perfectly average, C Tier Zonai Device. Is it bad? Not necessarily. Could it be so much better? Absolutely.
23. Hydrant - C Tier

This Zonai Device is a little bit over-hated, but still not great. It is awesome for building bridges across lava, weakening Igneo Taluses, and taking down Mucktoroks in the Water Temple and the Depths. It can also be used before you get Sidon's Sage ability to power up Zora Spears or the Lightscale Trident! But while these are all admirable properties, they can be easily replicated by a plethora of different items at Link's disposable, so while the Hydrant has some niche uses, it is still a pretty bad Zonai Device.
22. Mirror - C Tier

The Mirror has two applications: 1) solving puzzles and 2) blinding enemies if there are enemies nearby. Blinding enemies is nice and all, but simply shocking or freezing them is almost always the better alternative. While I have fun with the Mirror Shield, it is nowhere near as powerful as previous Zelda Mirror Shields, and as such, it is quite underwhelming. While this Zonai Device is fun and has some good application, it isn't really necessary, and anytime there is a puzzle involving light, a Mirror is usually conveniently placed nearby. So overall, good, but using a Frost or Flame Emitter can be much more powerful in battle then blinding ever will be.
21. Stake - C Tier

This can help you build some absolutely insane crap. However, I'm not really a crafting genius, and while I can acknowledge that this is a fantastic Zonai Device, this is my list and I am not too big of a fan of this device. Using it, you can make platforms, build huge creations that are otherwise much more challenging to make, and you can create some hard-hitting early game weapons. Overall, not bad, but not something I used outside of the Shrines that required its use.
20. Stabilizer - C Tier
Just like the last one on this list, this is great for creating huge builds, but it is just not really something I enjoy using. This can help build a better center of gravity for complicated builds that need pristine verticality, but since I mostly build hoverbikes and the sort, this just isn't really my thing. A great Zonai Device, but like the Stake, not really for me.
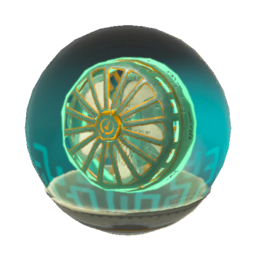
19. Small Wheel - B Tier
Another not-for-me Zonai Device... I promise, I do love some of these though, don't worry! I usually got around by teleporting to a tower and shooting to the sky, gliding with stamina-filled foods, Wings, and Tulin's Sage Ability. Or teleporting to a sky island and flying a hoverbike to my destination! I just never vibed with land vehicles all that much when I could be flying, and the Small Wheel doesn't quite have the applications that the Big Wheel had to cross rocky terrain or do crazy things in battle. While I understand this being good, I was more of a sky guy, so B Tier for this one.
18. Big Battery - B Tier
Yes, I just ranked the Big Battery below the small battery. Why? Because it can't come out of any Zonai dispenser. By the time the Big Battery is readily accessible, you will already have max battery power from fully upgraded Energy Wells. And what is even worse? You have to buy these for 30 crystallized charges... ten times as much as other Zonai Devices! While the ones you find across the world can be very useful, with how hard they are to obtain, these batteries are just quite mid in my opinion.
17. Portable Pot - B Tier

While you can theoretically place down a Travel Medallion, teleport to a stable with an actual pot, and then teleport back, that is just a slog. Having Portable Pots is just so nice and convenient to me, and while I can acknowledge that this is not an objectively amazing Zonai Device, I simply like it too much to place it anywhere else on this list.
16. Sled - B Tier
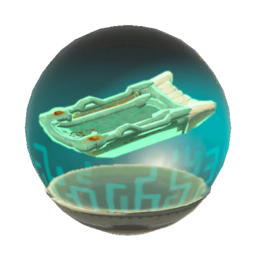
Putting this on your shield can be incredibly effective for shield surfing, especially on the snow mountains and sand dunes. On top of that, you can make this into some pretty useful boats! I used this quite a bit in these locations, but otherwise, this doesn't do all too much you can't do better in other circumstances, so overall, it is quite middle of the road.
15. Cart - B Tier
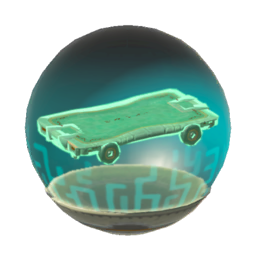
Carts are pretty fun, but like Sleds, they are just eh. They function in grasslands and rocky terrains than better the Sleds do, but otherwise, they are just about the same in terms of how good they are. I don't have much else to say about this mediocre Zonai Device, so it's time to move on.
14. Spring - B Tier

I don't have any problems with this Zonai Device, but I just personally resonate a lot more with the Rocket, which functions similarly in my mind. The Rocket gives much more ground, and the only thing I can see the spring being better for is the surely-soon-to-be-patched boinging glitch and for bouncing objects into the air. However, bouncing objects into the air is quite unreliable in my eyes. Overall, the Spring is a great device and is not bad, I just prefer the Rocket, so it places higher on this list. However, I can see the appeal of the Spring, and my brother prefers this over the Rocket any day of the week.
13. Flame Emitter - A Tier

This is one of the first Zonai Devices you get, and it is a very reliable one at that. I see people attaching this to their shields all the time, but personally, I find that rather flawed as it takes a ton of durability away from your shield. It can instead be great for giving weapons a little fiery bonus or even better? You can simply grab it with Ultrahand and place it where you want it to be, or even move it around according to where the enemy is! However, instead of manually controlling it? Attach this to a Construct Head or a Homing Cart, and you'll have an AI fiery beast on your hands. This device can be put to very good use, but compared to the Beam Emitter and the Frost Emitter, this just simply pales in comparison.
12. Wing - A Tier

This is an amazing device that can easily get you between islands in the sky. And since you can deploy them in mid-air? You can use a different Zonai Device like a rocket, build a hoverbike, or skyrocket with a pinecone-infused campfire... and then you can get to another island! You can get so much horizontal distance with this, and it is made better by attaching Fans to it for extra speed. However, once you create some more complex builds and store them into the archives of the Ultrahand ability, you can find much more effective ways of traversing the sky. Luckily, you can still attach the Wing to your shield to get increased height on a shield-surf jump to make it applicable even in the late-game! Overall, this is a great device for a while, but it eventually is outclassed.
11. Big Wheel - A Tier

Like I was saying about the Small Wheel, I am not really a huge fan of building cars and such. However, the Big Wheel can get you over some pretty rough terrain, which is helpful, and the way it spins? It lets you spread fire, ice, or beams in all directions, which is awesome! It is really cool in battle and is just almost wholly superior to the Small Wheel. Overall, very good, but not amazing.
10. Homing Cart - A Tier

This lets you do some awesome stuff by dishing out AI damage, and having an army of them can make you unstoppable, especially by having the Sages! Put some other Zonai Devices like Frost Emitters, Beam Emitters, or Cannons onto these guys? You can do some very awesome stuff! I don't absolutely love these AI devices, and that is why they aren't at the very top of the list, but they are still very powerful.
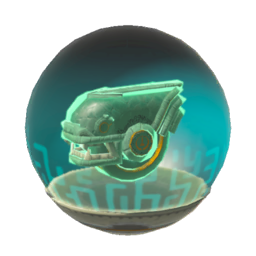
9. Construct Head - A Tier

Lots of people like Homing Carts better, but they are quite a bit slower and they don't aim and turn at quite the same speed. But the Construct Head and the Homing Cart have the same ideas—ideas that I definitely like, but don't love. Top of A Tier for these two, but not quite S Tier.
8. Beam Emitter - S Tier

This is very powerful if combined with powerful weapons, Big Wheels, or one of the two previous AI Zonai Devices. This is also really cool if you create some sort of mech or airplane, as it really has a range not available by any other Zonai Devices. While still not my favorite emitter, it comes super close, and while it doesn't deal too much damage, its still one of the best Zonai Devices in the game.
7. Frost Emitter - S Tier

I just like this slightly better than the Beam Emitter. Freezing enemies is just so much better than putting them on fire. While the range of the Beam Emitter is amazing, the Frost Emitter in combination with Mineru or an AI companion can make battles just that much easier. I love this device so much, and I think it definitely deserves its S ranking.
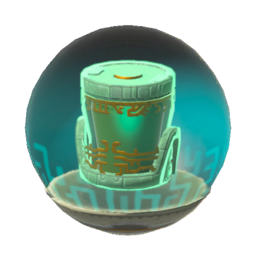
6. Battery - S Tier

I didn't necessarily use this Device as much as I probably should have, but it is so readily available and is just so much better than its bigger alternative! Without the Battery, it is so much harder to make huge and creative builds, and while I am more of a simplistic, frugal builder, there is no question that this is one of the best Zonai Devices in the game.
5. Fan - S Tier
I love hoverbikes. I love updrafts. I love boats. I love uber-powerful wind-powered Wings. And I hate sand, it's coarse and rough and irritating and it gets everywhere, and this can blow it all away. Put all of these together, and it is obvious that I love the Fan. This is an absolutely awesome Zonai Device, what can I say. I'm a sucker for turbulated wind.
4. Hover Stones - S+ Tier

This is absolutely biased. I am fully self-aware. Yes, this helps you build some staircases if you have a few of them. Yes, you can Ascend through them to get some height. Yes, you can cheese many puzzles at the Construct Factory with this Device. Yes, you can attach Rockets to Hover Stones and get some insane heights. Yes, you can keep Hudson's stupid signs up. But seriously, I love the simple yet awesome design of a cool-looking stone that hovers. I know I am biased, but this is my list, so deal with it :) Alright, let's move on.
3. Cannon - S+ Tier

The Cannon is so amazing. The Cannon is fantastic at dishing out damage and displacing enemies, allowing you to gain the upper hand on the battlefield. While it costs a ton of energy at the beginning of the game, as you get more Energy Wells, this becomes absolutely broken. Attach it to your weapon? You can do awesome damage. Attach it to a Construct Head or a Homing Cart? You can have an amazing AI companion. Put it in front of a bombable wall? You don't have to waste Bomb Flowers or deal with the annoying A-pressing of Yunobo or Riju bombing a wall. Personally, I love attaching a Frost Emitter, a Cannon, and a Fan on Mineru at all times to make her an ultimate battle machine. But anyway, I digress. The point has been made, let's move on to the runner-up on this list.
2. Rocket - S+ Tier

This is my favorite Zonai Device to use—and it isn't even close. To rocketing you into the sky to making builds so much faster and more effective, I just love the Rocket. If it actually lasted until your energy ran out instead of just disappearing? This would easily be in S++ Tier, to be honest. But personally? I just love this. Overall, this is my favorite Zonai Device, yet still one of the best.
1. Steering Stick - S+ Tier

While I like the Rocket more, this is definitely the objectively better Zonai Device. Without the Steering Stick, you can't control your builds, and that is a huge issue. But with the Steering Stick, you can do some amazing things. From controlling boats to mechs to airplanes to cars to hoverbikes to any other creative things you create, the Steering Stick is a necessary part of making these builds actually function. And because of this, it was almost a given that I would rank the Steering Stick as the best Zonai Device in Tears of the Kingdom.